

pfSense Bandwidth Manager: Setup and Management
Effective bandwidth management is critical to the performance of any network. In most networks many users share a single internet connection.
The biggest problem on a shared network is that one user could potentially consume all of the available internet bandwidth and slow down the connections for all of the other users as a result. High-bandwidth users can create an even bigger problem if your network has critical traffic such as VOIP that depends on having enough bandwidth to function.
The solution to problems like this is to implement a traffic shaping system. Traffic shaping can prioritize your important or time critical network traffic to guarantee performance and at the same time throttle less important traffic.
In this hub I will show you how to use pfSense, an open source firewall, to configure traffic shaping to manage your networks bandwidth.
If you are unfamiliar with pfSense you might want read through an Introduction to pfSense first.
How to Find High Bandwith Users
In order to properly manage bandwidth usage, you need to determine who is using the most bandwidth and why.
PfSense offers a package called Darkstat that can quickly give you a view of what is taking place on your network.
Darkstat creates a list of hosts sorted by total upload and download traffic usage. You can also drill down on this report to see which TCP or UDP ports make up that usage. This information can be used to determine whether a traffic shaper will help your network, and if so which ports you should be shaping.
How to Set Up and Configure pfSense Bandwith Traffic Shaper
The instructions in this hub were created for pfSense version 2.0, if you haven't upgraded to the latest version I would recommend doing so first. The traffic shaper in version 2.0 has many improvements over the previous version.
In the sections below I have included a screenshot of each step of the set up process and a description about each page. After completing these steps you will have a fully functional traffic shaper for your home or corporate network.
Step 1: Run the Shaper Wizard
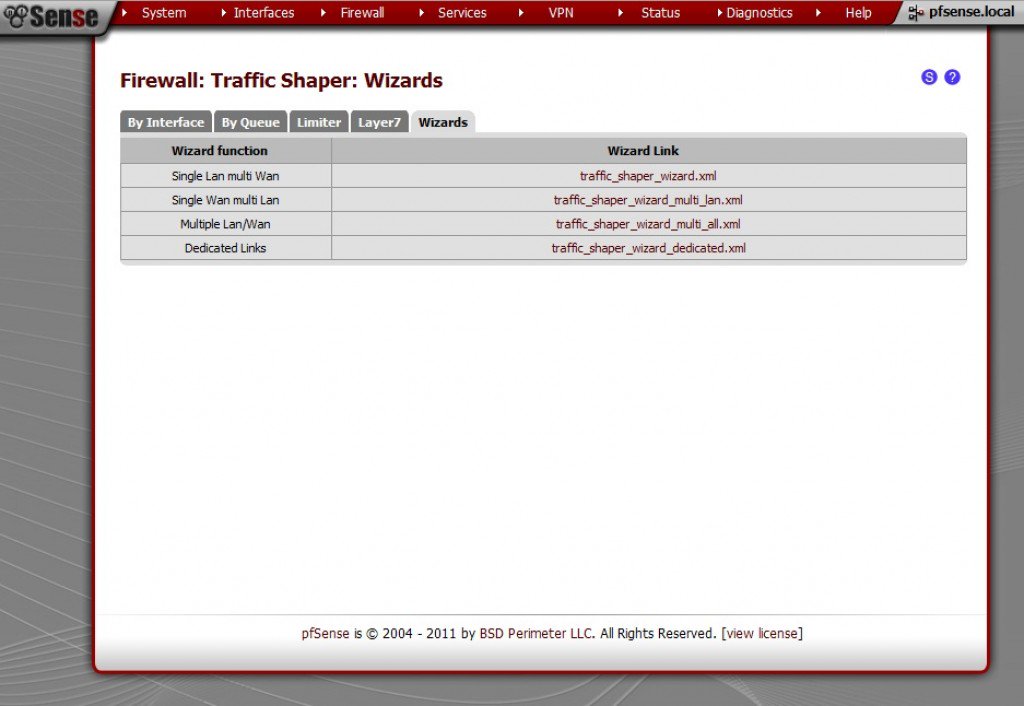
Traffic Shaper Wizard
To get started, log in to your pfSense system using the web interface. Next open up the traffic shaper menu found under the firewall tab.
PfSense allows you to manually configure the traffic shaper although I would recommend using the traffic shaper wizard and then tweaking things if needed.
Click on the "wizards" tab then select the wizard link that matches your current setup. My pfSense system is set up as a dual wan router so I will be using the Single LAN multi Wan wizard. If you only have a single WAN and LAN connection you should also use this wizard.
Step 2: Specify Wan Connection

Enter the number of WAN connections
On the next step you need to enter the number of WAN connections on your router. If you have a single WAN router just enter "1." If you have a dual WAN router you would enter "2." If you are not sure how many interfaces are configured click on the status tab, then select interfaces.
Step 3: Shaper Configuration
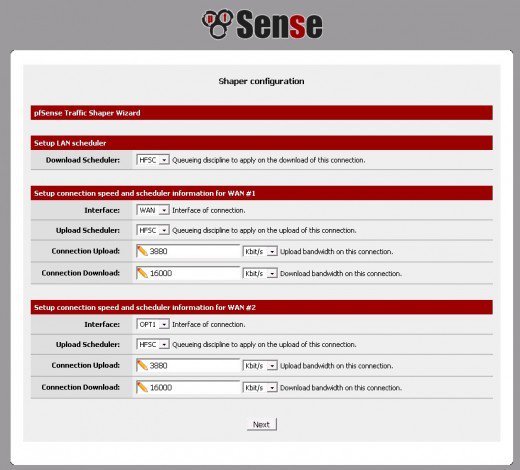
Shaper configuration
On the shaper config page the first thing you need to do is select the LAN scheduler.
I would recommend using the default which is HFSC (Hierarchical Fair Service Curve). If you need only very basic shaping you could use PRIQ (Priority Queuing) which is simple to modify but not as efficient.
In the connection upload box, I recommend entering "97%" of the connection's maximum bandwidth. For example if your ISP provides you with a 1Mbps (1000Kbps) upstream then you would multiply 1000 x 97% to get 970Kbps. This will ensure that packets are queued on your pfSense system instead of an upstream router which you have no control over.
In the connection download box, enter the maximum downspeed of the connection.
If you are unsure of your connection speed, contact your ISP or use an online speed test to get an estimate. You may need to slightly tweak these settings to find the optimal configuration for your connection.
Step 4: Voice Over IP Settings
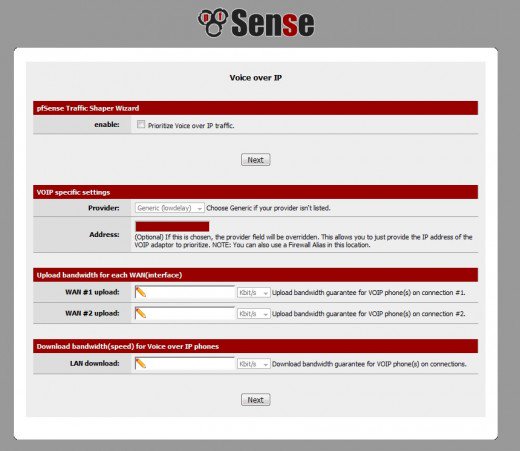
VOIP Settings
If you are using VOIP phones, you will probably want to prioritize the traffic sent by the phones. Click the check box to enable this setting. Then select your VOIP provider from the list.
If your provider is not listed choose 'generic', then enter the IP of your VOIP phone. If you have multiple VOIP phones on your network, you can create an alias (Firewall\aliases) that consists of multiple hosts.
If you are not using VOIP leave this setting disabled and click next.
Step 5: Penalty Box
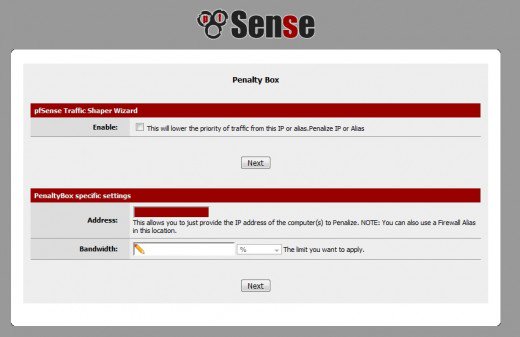
Penalize Specific IP Addresses
If you have one or more hosts on your network that are using most of the bandwidth, you can place them in a "penalty box" to limit their usage to a certain percentage of available bandwidth. As in the previous setting if you need to list more than one host you will need to create an alias.
Step 6: Peer-to-Peer Networking
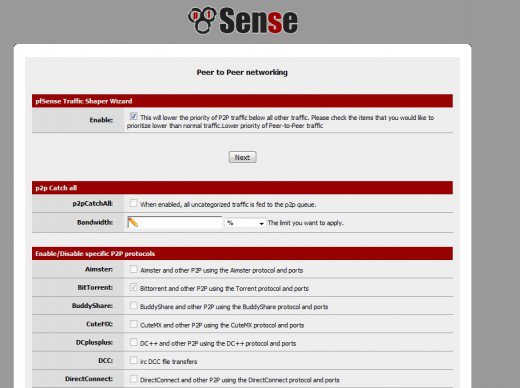
Peer to Peer Network Settings
In this section of the wizard, you can specify whether to de-prioritize peer-to-peer networking traffic. Almost everyone will want to enable this setting since P2P traffic is often the largest user of internet bandwidth on a network. Enable the check boxes next to each application that you want the traffic shaper to look for on your network.
You can also enable the P2P catch-all setting to penalize uncategorized traffic. If this setting is enabled, any traffic not specifically classified in the traffic shaper will be considered P2P traffic. Generally I don't like to use this setting because I feel that it is too broad, but if you want to take an aggressive approach to packet shaping you can enable this setting.
If the there is a specific protocol you need to block that isn't listed I'll show you how to manually create a rule later in this guide.
Step 7: Prioritize Game Traffic
Network Games Settings
On the network games page, you can grant game traffic priority on the network. This is very useful for lowering the latency of game traffic which is very time sensitive.
With this setting enabled users on the network can still be uploading/downloading files without impacting users playing games. For example players of MMORPG games like World Of Warcraft can improve their ping times by enabling this option.
Step 8: Other Applications

Raise or lower other Applications
You can also raise or lower the priority assigned to different applications on an individual basis. Most of the options on this page depend on the applications in use on your network. Most users will probably want to raise the priority of HTTP, DNS, and ICMP. Depending on how important email is to your network, you could raise or lower its place in the queue.
If the wizard does not list all of the applications that you need then you can create your own custom traffic shaping rules.
Step 9: Customizing the Rules
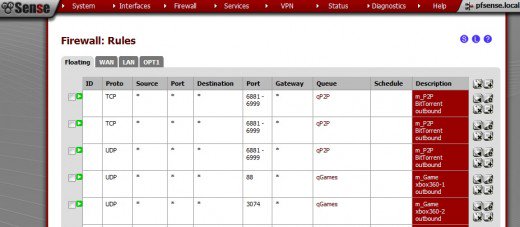
Editing the Traffic Shaper Rules
If the wizard did not list an application or protocol that you want to traffic shape you can add or edit the rules created by the wizard as needed. The rules created by the shaper are found on the Firewall\Rules page. Click on the tab labeled 'floating' and you should see a list of rules generated by the wizard.
If you don't see the rules, run the wizard again and make sure the applications were enabled. Sometimes you need to deselect/select the checkbox. If the options are grayed out, then they are not enabled.
You can adjust the ports of existing rules or create entirely new rules if you want. The easiest way to do so is to create a rule based on an existing rule that is similar to what you are trying to accomplish. To do this click the plus symbol next to the rule you want to copy. The queue names are fairly self explanatory as to what their purpose is.
For a list of of all the queues and their current settings, open the traffic shaper page found in the firewall menu.
pfSense Bandwidth Management: Monitoring the Queue Status
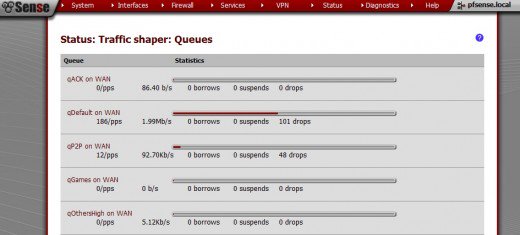
Queue Status
After you have finished setting up the shaper, I recommend monitoring the status of the queues. It's a good idea to check the queues during times of heavy bandwidth usage to make sure everything works as intended. You may find that you need to make small tweaks over time to improve the system.
The queue status page is found under the diagnostics menu. If a queue is showing drops, then traffic exceeds the amount of bandwidth allocated to that queue. It's normal to have drops on the P2P queue or other low priority queues: that means the traffic shaper is doing its job.
If you are seeing drops on the ack or default queues then you may need to grant more bandwidth to them. This can be done in the traffic shaper settings page by clicking on the queue you want to adjust.
Acknowledgments (acks) can consume a very large portion of your total bandwidth during heavy downloads. The faster a computer can acknowledge the receipt of a packet the sooner the sending computer will send the next piece of the file so you want these packets to leave your network quickly.
Deep Packet Inspection
Deep packet inspection, also known as layer 7 shaping, identifies traffic based on the content of the packets instead of just the source or destination ports. If you are trying to manage traffic that uses many different port numbers, you should use deep packet inspection.
This feature is only found in pfSense version 2.0 and newer.
To create rules for this type of traffic click on the layer 7 tab found under Firewall\Traffic Shaper. You can create rules to either block certain protocols or route it to one of the queues.